The following is a reflection on Week 3 of the Instructional Design and eAuthoring module using Gibbs Reflective Cycle. The group meeting and homework for this week is also discussed.
Description
Today we talked about Storyboarding, VLE’s in Higher Education and Instructional Design models. Storyboarding is a new concept for me but one that I find interesting.
“Storyboards are visual organizers, typically a series of illustrations displayed in sequence for the purpose of pre-visualizing a video, web-based training, or interactive media sequence.”
http://www.instructionaldesign.org/storyboarding.html
There are 3 types of storyboards
- Passive – sketches, screenshots, Powerpoint,
- Active – animations, slideshows, demos
- Interactive – where the user has the participate
Damian showed a strong preference for the Passive storyboarding. Here is an example of one he showed us in class from the movie Gladiator
Images from Webcourse Notes
VLE’s Higher Education
Claire spoke about research she has carried out which identifies how Blackboard isn’t being used as planned. Activity Systems which is an analysis of activities was implemented.
Instructional Design Models
Damian showed us lots of instructional design models which all appeared to be variations of the ADDIE model (Analyse, Design, Implement and Evaluate). I was aware of the ASSURE model, Dick and Carey Model, Gilly Salmon’s Five Stage Model, Bloom’s Taxonomy (as noted in Damian’s notes one of the most universally applied models) and Laurillard’s Conversational Framework. However, I was not aware of the revisions to Bloom’s Taxonomy and agree that this revision takes a broader range into consideration.
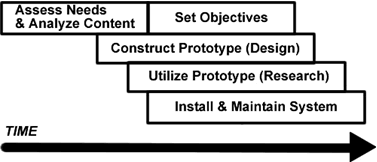
Tipp and Bichelmeyer was a new model for me which occurs in rapid prototyping where the analysis comes from the results of the prototype.

Tipp and Bichelmeyer
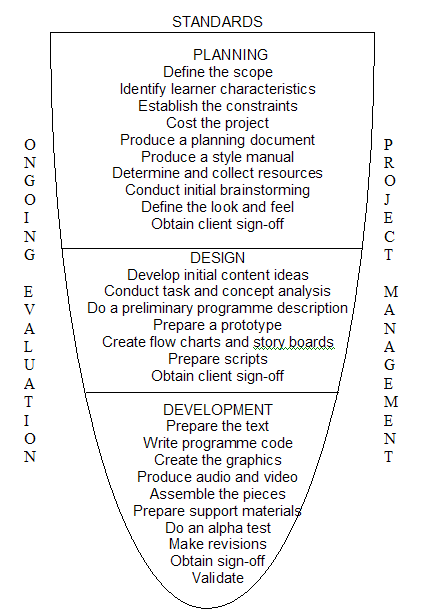
Furthermore, Alessi and Trollip’s Design and Development Model was a new model. However, it resembles the ADDIE Model.

Alessi and Trollip’s Design and Development Model
We are using the ADDIE model for our group project as it is user friendly and very popular.
A new term for me is macro and micro models. Macro models relate to the design and planning of an entire course/programme. Next week we will discuss Micro model which relates to individual lessons/sessions. I wonder will Chickering & Gamson appear on that which I have implemented in the project?
A new concept for me today was also the Morphological Matrix which is a tool for generating options in the design process. Below is an example of one for gardening which may be relevant to our project. We must also create a site map for our project which gives ‘the big picture’ overview.
Webcourse Notes
Feelings
I feel that storyboards are very constructive. A picture tells a thousand words so form a design perspective it is a good tool for planning and everyone in the group will have a good idea of the structure and end product. It may also identify any issues at the early stages in helping the design process run more effectively.
Evaluation
I enjoyed the variation in the lectures today and found all topics very interesting and very relevant.
Analysis
With regard to VLE’s I have heard in the past that many third level students do not use Blackboard on a regular basis. However, they will collaborate with other learners on other platforms such as Facebook. Therefore, I question the visual appeal of VLE’s. What is it about Facebook that motivates them to use it as oppose to Blackboard?
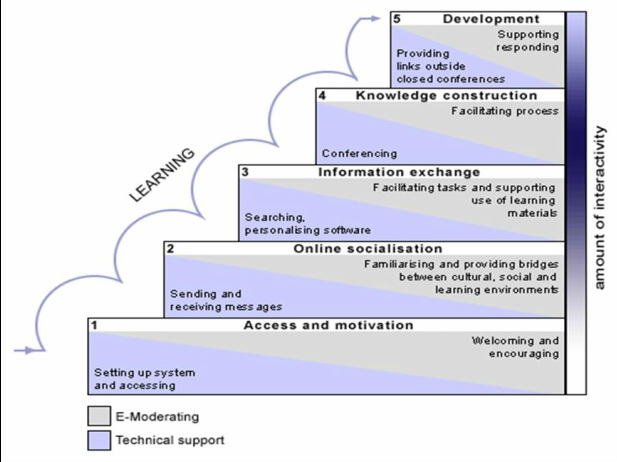
The Instructional Design models were very interesting and I was amazed at the different macro models that exist. One of my favourites is Gill Salmons Five Stage Model of eLearning. It isn’t a model that I have had the opportunity to implement but hopefully I will in the near future. It relates to e-tivities. According to Salmon eTivities are ‘frameworks for enabling active and participative online learning by individuals and group’ (Salmon, 2013, p.5). The reason I like this model is it is structured with scaffolding and ongoing support for the learners. Furthermore, it encapsulates principles and pedagogies. The purpose is to make the work of e-moderators more productive and concentrated.

Gilly Salmon Five Stage Model
Conclusion
Storyboards are visual organisers used in the planning stages of instructional design. They will display information such as characters, timings, sequence etc. They can be in different formats e.g. passive, active or interactive.
VLE’s are an excellent tool used by lecturers to store information and interact with students but research shows that it is not widely used by students. Furthermore, the technical skills of the lecturers could also be questioned?
Instructional Design models provide frameworks and guidelines in the creation of a project. The ADDIE model is one of the most popular and many are based on this model e.g. Dick and Cary model ASSURE. Instructional Design gives structure and researched models provide excellent guidelines. Some take pedagogy into consideration which I feel is vital in planning an eLearning project.
Action Plan
We will use the ADDIE model in our project but going forward it is important that I research the new models to see if elements of it may be beneficial for future projects.
References:
Salmon, G. (2013). E-tivities The Key to Active Online Learning (2nd ed., p. 5). New York: Routledge.
Group Meeting
We met before class this morning and Rachel drew with the input of the group an Instructional Design Overview. This is beneficial and gives us all a good overview of the project. Lorraine, the resident gardening expert, has narrowed the vegetables down to onions, garlic, beans, peas, carrots and beetroot. On reflection, I feel out of my comfort zone as I always create my own content for courses and furthermore I have no knowledge of the subject. However, from an instructional design view many designers design projects where they are not an expert.
Below is a snapshot of the Action Items for the project
I was unable to show the girls the introduction video I did in Video Scribe as there was no WiFi available in DIT and the software needs to be installed on the computer. I told the girls I would upload to YouTube and will share the link with them. Emma has been assigned to do No. 1 in the picture above, and Rachel and Lorraine to do No. 2. We are all to be involved in No. 3. My task is to create a storyboard for the video and I’m looking forward to doing that. I will also keep working on the RealTime Board syncing the theory and practice.
Homework
This week was busy and I am delighted that I was able to immerse myself in eLearning technology which is one of my main goals for carrying out this Masters. I have also managed to get some work done on my annotated bibliography. It is difficult to find peer reviewed information on gardening but I found a paper entitled Gardening in Cyberspace by May and Short, 2003 which uses gardening as a metaphor for online teaching e.g. soil preparation is parallel to the different learners types and testing. Watering is similar to feedback which is essential and controlling of weeds is in parallel to information overload.
May, G. L., & Short, D. (2003). Gardening in cyberspace: A metaphor to enhance online teaching and learning. Journal of Management Education,27(6), 673-693.
eLearning Toolkit
I accessed the online resource from http://elearningtoolkit.pbworks.com as requested on webcourses. This is from NUI Galway and has some excellent tips on designing effective eLearning. It even has a copy of the manual from the VLE module I studied in NUI Galway. I will certainly mark this webpage as a favourite.
Introduction to Character
I delved further into Video Scribe and while I find it to be very beneficial I realised that there were limitations with regard to its implementation to this project. Firstly, I am restricted with the characters and secondly having conformity with the character in Articulate may not be possible. It would not make sense to introduce a character who changes when the course commences in Articulate.
Therefore, I downloaded a free trial of Articulate Storyline 2 in order to export a character from it to Video Scribe. The resolution was poor and I felt that it was not visually appealing as you will see from watching the above video.
So I have decided to see what Articulate can offer me in terms of creating an introduction. I have never used it before and I am looking forward to exploring this software which is very popular in the eLearning sector.
After spending many hours playing with Articulate I have created a video similar to that of the one I did on Video Scribe. Here it is:
https://www.youtube.com/watch?v=Be9HN81fak0&feature=youtu.be
Lesson Learned
While I loved creating and playing with the new technology, on reflection, I let the technology dictate everything. While I can argue that I need to be aware of the abilities and limitations of the technology the planning stage at the beginning is fundamental. Damian discussed storyboarding with us this week and I need to adhere to this. Therefore, before I start recreating the introduction I need to carefully script and plan the content.
Furthermore, putting my learner cap on and looking at the video again from a learners perspective it is quite confusing. It looks nice and colourful but the timing of the slides is out and I need to work more on my script before I develop it. While the visual is nice it is too much. I have also being doing some research by watching other E-learning courses and many lead into the introduction quickly. Therefore, mine is too long whereas getting straight into it is more productive. I will revert to planning by scripting and storyboarding and will put this down to a lesson well learned in going forward. For the purpose of our meeting this week I will do a short prototype for the girls and based on researching other resources will apply some audio. I have created a draft script and here is the prototype I will show the girls on Tuesday.
Draft Script
- Hi (pause) I’m Mary
- Like many of you I’d like to eat healthier and learn how to grow my own vegetables
- But how do I get started
- (Pause)
- Click on the next button at the bottom of the screen to learn along with me and let’s get healthy together
Prototype for Tuesday
https://www.youtube.com/watch?v=v55vvrrK9VU&feature=youtu.be
For some reason the sound came out funny but I will be using a professional microphone when I am doing the real one.
Logo
I also decided to create a logo to give a more uniformed and professional look to the project. I came up with the following three and the first was chosen by the group. These were created in Illustrator and I kept it simple.


Project Management
I have also been reflecting on the project overall and based on our group discussions of having structure I have set us up on Trello. Trello is a web based project management software which enables us to create scheduled tasks in a visual and easy to use format. It is also free. I have created a board for The Good Life and will post our overall progress on a weekly basis. I have set up a card for To Do, Doing and Done so that we can drag and drop when appropriate.

I have created labels for each group member in alphabetical order so that visually we can see our contribution and progress on an individual and project level.

I have also included the actual deadlines so that we can see our targets. I have also incorporated a calendar which captures all our schedules. I have told the group that it is important that we keep this up to date and use it to illustrate our progress.
Google Hangout
Emma is in Poland this weekend so three of us had a chat and I asked them if they were happy to use Trello and they were delighted with it. We have decided to do our 3 minute recording next Tuesday before class. I told the girls I will show them what I have done on the video and Rachel will give a prototype. Lorraine is working on the learning outcomes for each module and finalising the content. Emma has been working on the site map and resources.


